- Continue Shopping
- Your Cart is Empty
Free Standard Domestic Shipping over $30
Necklace Layering Guide: Master the Art of Perfect Stacks
A solid necklace stack begins with a few core ideas: playing with different lengths, picking a star piece, and mixing up your textures. Once you get the hang of these, you’ll go from a tangled mess of chains to a look that’s effortlessly chic and intentional. It’s less about hard-and-fast rules and more about creating a bit of visual harmony that just works.
The Foundations of a Flawless Necklace Stack
Getting that perfectly curated layered look is definitely an art, but it's one anyone can learn. The whole point is to turn a simple handful of necklaces into a statement that’s uniquely you. So, let’s ditch the frustration of knotted chains and mismatched pieces—the key is to approach it with a little strategy.
Layering isn't just a fleeting trend; it’s a reflection of how we want to accessorize now. People want versatile, personal pieces, and that desire is a big reason the global jewelry market is expected to hit an estimated value of $348 billion in 2025. Layering is the perfect way to express that personal style.
Start with Varied Necklace Lengths
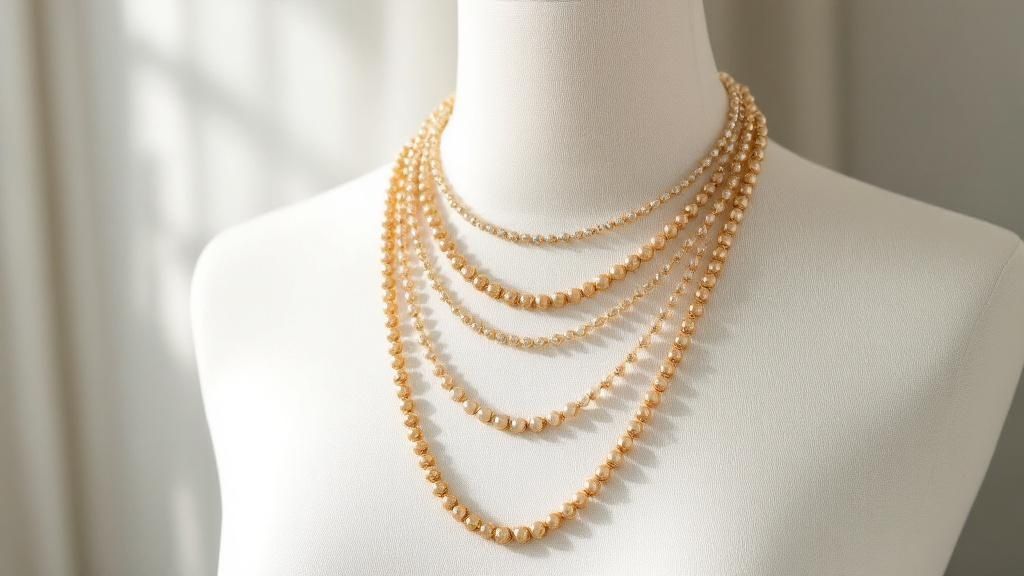
The most important step, and the one that makes the biggest difference, is varying your chain lengths. This is what creates that beautiful, cascading effect we’re all after. Without enough space, necklaces just clump together, hiding each other and ruining the whole look.
As a rule of thumb, I always suggest aiming for at least a one-to-two-inch difference between each necklace. This gives every piece its own space to breathe and dramatically cuts down on tangles throughout the day.
To get a better sense of how different lengths work together, I've put together a quick reference table. It's a great starting point for visualizing how to build your stack from the collarbone down.
Essential Necklace Lengths for Layering
| Length (Inches) | Common Name | Typical Placement | Layering Role |
|---|---|---|---|
| 14-16 | Choker | Sits high on the neck | Your top, foundational layer |
| 17-19 | Princess | Rests on the collarbone | The perfect mid-layer |
| 20-24 | Matinee | Falls on the chest | An ideal bottom layer or hero piece |
| 28-36 | Opera | Hangs below the bust | For dramatic, longer stacks |
This table should help you choose pieces that won't compete for the same space. If you're still not sure where a chain might land on your own frame, you can check out this helpful guide to necklace chain lengths at https://www.efytal.com/blogs/chain-length to find your perfect fit.
Select Your Hero Piece
Every great necklace stack has a story, and at the center of that story is a "hero" piece. This is the necklace that acts as the focal point for your entire look. It’s what anchors the stack, draws the eye, and gives the other, simpler layers a reason to be there.
So, what makes a good hero piece? It could be anything, really:
- A bold pendant with an interesting shape.
- A meaningful charm or a personalized initial necklace.
- A chain with a pop of color from a gemstone.
- The chunkiest or most textured piece in your collection.
Once you’ve picked your hero, the rest is easy. You just build around it. If your main piece is a long pendant, add shorter, more delicate chains above it. If it's a statement choker, complement it with longer, simpler chains that fall below.
My Favorite Tip: Always put your hero piece on first. Then, add the supporting layers around it. This makes it so much easier to get the spacing and balance right, ensuring your focal point really shines.
Embrace the Rule of Three
While you can technically layer as many necklaces as you want, starting with three is almost always the magic number. The "Rule of Three" is a classic design principle for a reason—it creates a look that feels complete and balanced, not too sparse or too overwhelming. A trio of necklaces gives you enough variety to look intentional without being over the top.
It’s all about creating that visual harmony. Thinking about how different pieces of an outfit work together is a skill, and if you want to go deeper, you can master the art of matching clothes for a totally cohesive style. Once you feel confident with a three-necklace stack, you can easily experiment with more for a bolder statement or pare back to two for a more minimal vibe.
Curating Your Perfect Necklace Stack
Building a great necklace stack is more art than science. It's not just about grabbing a few chains from your jewelry box—it's about telling a story. Think of it like a gallery wall; each piece is lovely on its own, but together, they create something truly special and personal.
The way we build these collections has changed so much, thanks to the explosion of online shopping. High-quality visuals, like professional jewelry product photos, give us the confidence to mix and match pieces from different designers right from our couch. It's a huge market, valued at $46.1 billion in 2024, and it's still growing. This easy access means you can find and build your dream stack from anywhere in the world.
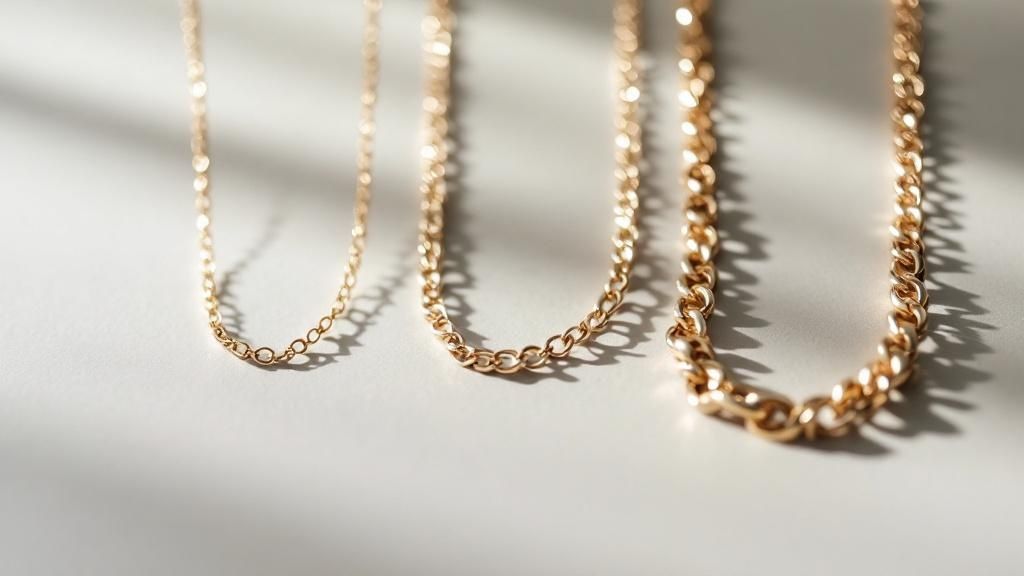
Balance Different Chain Weights
The secret to a visually interesting stack? Playing with different chain weights. If all your chains are super delicate, they can get lost or, even worse, turn into a tangled knot. You want a dynamic mix that gives your look some real depth and dimension.
Try starting with a fine, barely-there chain and pairing it with something that has a bit more presence. A delicate cable chain, for example, looks fantastic next to a slightly thicker curb or rope chain. The contrast is what makes it work—it keeps the chains from blending together and gives each one its own moment to shine.
- For a classic look: Pair a delicate 16-inch chain with a mid-weight 18-inch figaro chain, and finish with a 20-inch snake chain.
- For a bolder statement: Mix a chunky paperclip chain with a thin box chain and a simple satellite chain.
This interplay between dainty and substantial is what creates a compelling, professional-looking stack.
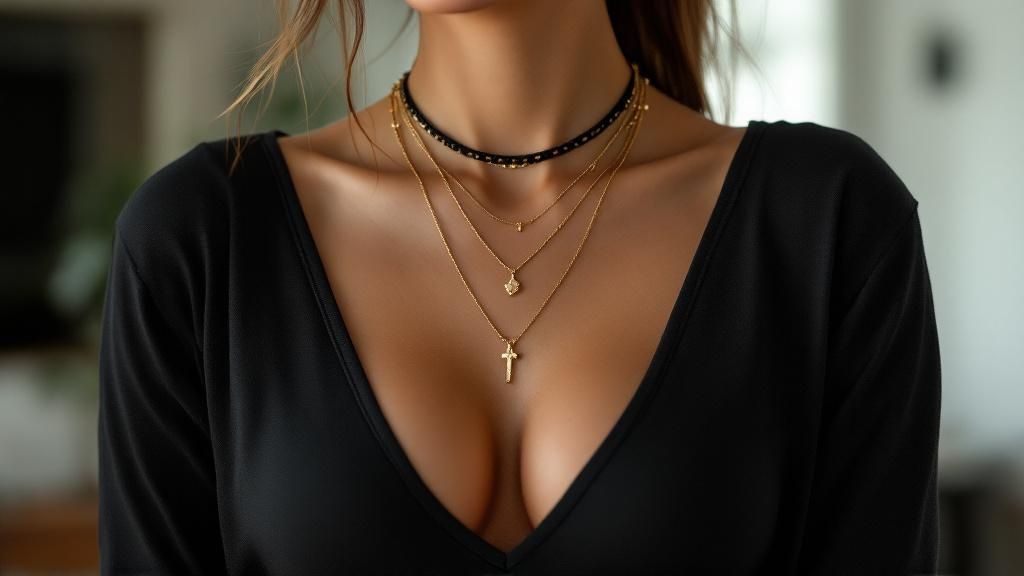
Incorporate Pendants and Charms
This is where your personality really comes out to play. Pendants and charms are the storytellers of your stack, whether it’s a vintage locket, a meaningful birthstone, or a simple initial. The key is to place them strategically so they anchor the look without overwhelming it.
A classic move is to let your pendant be the star of the show on its own chain. Placing it on the longest chain creates a flattering V-shape that draws the eye downward, which can really elongate the neckline. It’s an almost universally flattering trick.
A Personal Tip: I love putting a tiny, subtle charm on the shortest chain, right at the collarbone. It adds a little whisper of personality that doesn't compete with a larger, hero pendant further down. It’s a small detail that makes the whole stack feel uniquely yours.
Mix Up Your Textures
Beyond just weight, the actual texture of your chains is what adds that next level of sophistication. When you combine different finishes and styles, you create a rich visual experience that looks far more intentional and high-end.
Think about putting contrasting surfaces side-by-side. A smooth, slinky snake chain looks incredible next to the intricate, diamond-cut sparkle of a rope chain. Or, try a modern, polished chain with a string of organic, freshwater pearls. The way the light catches each different surface adds a subtle complexity that is just beautiful.
Here are a few texture combinations to get you started:
- Smooth & Intricate: A sleek box chain paired with a detailed wheat chain.
- Polished & Organic: A high-shine chain next to a string of natural gemstones.
- Modern & Vintage: A contemporary paperclip chain layered with an heirloom-style locket.
Of course, the quality of your materials matters. Well-made pieces in sterling silver or 14k gold-fill ensure your stack not only looks beautiful but will last for years. If you're wondering what makes these materials such a great investment, you can learn more by checking out our guide on what demi-fine jewelry is and why it's perfect for building a collection you'll love.
Mixing Metals and Materials with Confidence
Let's just get this out of the way: the old rule about never mixing metals? It’s officially retired. In fact, wearing gold, silver, and rose gold together is no longer a mistake—it's the mark of someone with a confident, modern style. When you do it with a little thought, a mixed-metal stack looks incredibly chic and intentional.
The real secret isn't just throwing them all on at once. It’s about creating balance so the mix feels curated, not accidental. You're aiming for a look where each piece works with the others to tell a more interesting visual story.
Create Harmony With a Bridge Piece
One of the simplest tricks I've learned for mixing metals is to use a "bridge" piece. This is just one necklace that already has two or more metals in its design, like a pendant with both gold and silver accents, or a chain made of alternating metal links.
This single piece acts as the anchor for your whole stack. It immediately signals that your metal mixing is deliberate and ties everything together. It gives your other, single-metal necklaces a reason to be together.
- For example: Try layering a two-tone pendant with a simple gold chain above it and a delicate silver one below. That central pendant makes the whole combination feel completely natural.
Master the Warm and Cool Contrast
The visual appeal of mixed metals really comes down to the beautiful contrast between warm and cool tones. Yellow and rose gold radiate warmth, while silver, platinum, and white gold give off a cool, crisp vibe. Playing them off each other is what makes a stack so dynamic and pleasing to the eye.
A great way to get started is to choose one dominant metal and then add just one or two accent pieces in a contrasting tone. If your jewelry box is full of gold, just try adding a single, fine silver chain into the mix. That little pop of coolness adds so much dimension without taking over your signature look.
My Personal Tip: Rose gold is the ultimate peacemaker between metals. Its soft, pinkish hue bridges the gap between classic yellow gold and bright silver perfectly, making it a fantastic addition to almost any mixed-metal look.
Balance Your Metal Ratios
While I don't believe in strict rules, paying attention to the ratio of your metals can really help polish your stack. I find a 70/30 or 80/20 split usually looks best. This just means you let one metal be the star of the show while the other plays a supporting role.
So, you might wear three gold necklaces and just one silver one. This creates a striking accent that feels more deliberate than a 50/50 split, which can sometimes look a bit haphazard. It’s a simple guideline that helps you maintain a primary color story while still getting all the benefits of a mixed palette. The finish of your pieces matters, too; you can learn more about why 14k gold-plated jewelry is so popular for creating stacks that are both beautiful and built to last.
Go Beyond Metal With New Materials
Layering is about so much more than just metal. Bringing in different materials is where you can add incredible texture, pops of color, and a touch that's uniquely you. This is your chance to get creative and really let your personality shine through.
Think about weaving in pieces that break up all that metallic shine. Adding a different texture or color can soften the entire look and make it even more interesting.
Materials to Experiment With:
- Pearls: A classic pearl strand or a single pearl pendant brings a touch of timeless elegance and organic softness to any stack.
- Gemstones: Add a pop of color with your birthstone or any favorite gem. It instantly becomes a beautiful focal point.
- Enamel: Colorful enamel charms are perfect for a playful, modern feel and give you endless opportunities to coordinate with your outfit.
- Beads: From tiny seed beads to chunks of natural stone, beads add an amazing artisanal texture and a bohemian vibe.
When you start mixing metals and materials with confidence, you stop just following trends and start creating a style that’s all your own. It's all about experimenting to build stacks that truly reflect who you are.
Matching Your Layers to Necklines and Occasions
A truly great necklace stack doesn't just add a finishing touch—it pulls the entire outfit together. The real magic happens when you nail the synergy between your necklaces and your neckline. Get it right, and you elevate your whole look. Get it wrong, and you can end up with a cluttered, confusing mess right where you want a clean focal point.
Think of it this way: your neckline is the frame, and your necklace stack is the art inside it. A deep V-neck creates a natural plunge that’s just begging for layers that follow that line, anchored by a beautiful, long pendant. On the flip side, a high crew neck or a cozy turtleneck closes off that space, calling for a much tighter stack of chokers and short chains that sit neatly above the fabric.
Styling for Different Necklines
Matching your layers to your top isn't about following a strict set of rules. It’s more about feel—about working with the space you have. Once you get the hang of it, it becomes intuitive. The core idea is simple: complement the shape, don't compete with it. A well-chosen stack should feel like a deliberate, natural extension of your clothing.
Let's walk through some of the most common necklines and how I like to style them.
-
Crew Necks & Turtlenecks: With these high necklines, your best bet is to keep things short and sweet. Your stack should either peek out right above the shirt's edge or, for a turtleneck, lay entirely over the fabric. A tight little stack of two or three chains—maybe a 14-inch choker paired with a 16-inch and 18-inch chain—is absolutely perfect here.
-
Scoop Necks: This classic rounded neckline is incredibly versatile. I love to fill that open space with a rounded stack of necklaces that mirrors the curve of the shirt. It creates such a soft, flattering effect. Try mixing chains from 16 to 22 inches to get that gentle cascade.
-
V-Necks & Button-Downs: These necklines are a gift to necklace lovers. They create a "V" shape that naturally guides the eye downward, making them ideal for a dramatic stack. I almost always go for a plunging look with a long pendant (think 20 inches or more) as the final piece. If you’re wearing a button-down, leaving the top two or three buttons undone creates the perfect canvas.
-
Strapless & Off-the-Shoulder: When your collarbones are the main event, you have so much freedom. A simple, striking choker or a delicate stack of very short chains (in the 14 to 17-inch range) draws just the right amount of attention to your neckline and shoulders without overwhelming the look. It's chic, elegant, and timeless.
My Personal Takeaway: It's all about creating visual balance. If your neckline is high and covered, keep your necklaces short and close to the neck. If your neckline is low and open, you have way more room to play with longer, more dramatic layers.
Adapting Your Layers for Any Occasion
Just as you wouldn't wear your weekend brunch outfit to a formal wedding, your necklace stack needs to adapt to the occasion. The context of where you're going should guide everything—from the boldness of your pieces to the metals you choose.
For a professional setting, less is almost always more. A delicate, minimalist stack of two fine chains, maybe with one tiny charm, adds a touch of polish without being distracting. I tend to stick with sterling silver or fine 14k gold-fill pieces that whisper elegance instead of shouting for attention.
Here's a quick visual guide that I find helpful, especially when dressing for a specific event where color coordination is key.
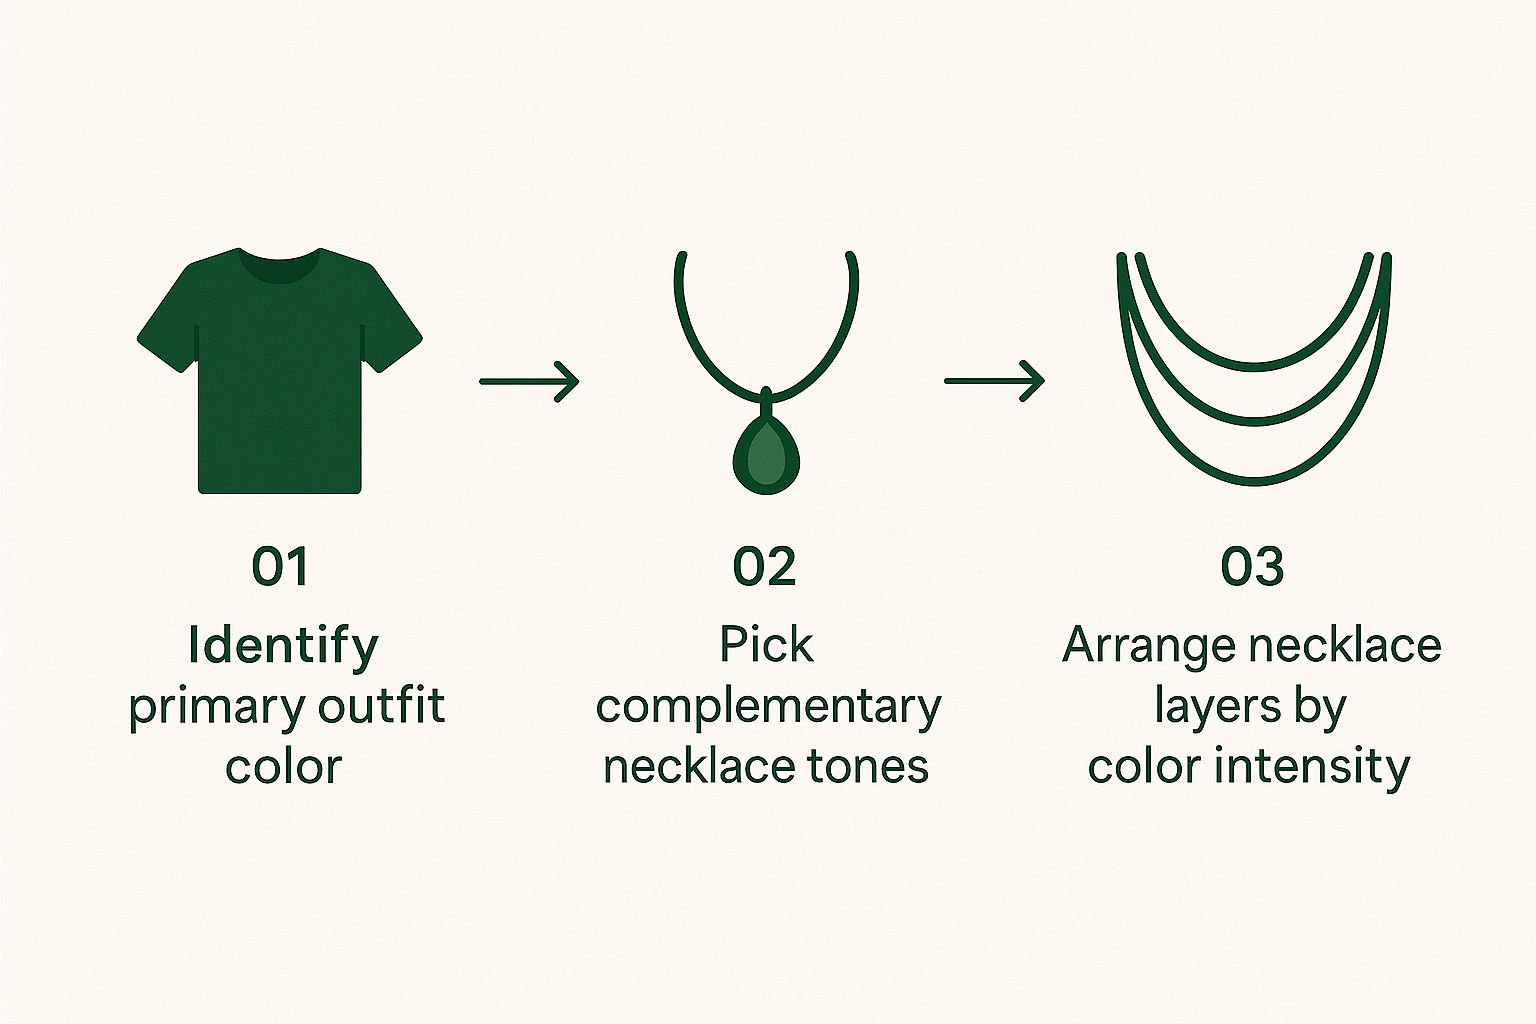
Starting with your main outfit color, as shown here, makes it so much easier to choose complementary necklace tones and arrange them in a way that just works.
Now, for a night out, a party, or a wedding? That’s your green light to go bigger and bolder. This is the time to break out your statement pieces, mix your metals with confidence, and play with texture by incorporating gemstones or pearls. There's a clear trend towards these more eye-catching styles; the luxury jewelry market is projected to soar from $57.13 billion in 2025 to $109.2 billion by 2032. You can see more on these luxury market trends and how they're shaping what we wear.
Ultimately, layering is about creating a look that feels authentic to you, to the outfit you’ve chosen, and to the room you’re about to walk into.
Common Layering Mistakes and How to Fix Them
We’ve all been there. You craft what seems like the perfect necklace stack in front of the mirror, only to find it’s become a tangled clump an hour later. It's a common story, and even seasoned jewelry lovers run into these little hurdles.
The good news? Every common layering problem has a surprisingly simple fix. Think of troubleshooting your stack as part of the fun—learning what doesn't work is just as important as knowing what does. Let's walk through the most frequent issues and how to solve them for good.
The Dreaded Tangle
This is, without a doubt, the number one frustration. A beautiful stack twists into a single, knotted mess. This almost always happens when your chains are too similar in length and weight, which causes them to constantly roll over each other as you move.
Your secret weapon in this fight is a necklace spacer clasp. This small but mighty tool has multiple rings attached to a single bar, holding each necklace in its own lane. It keeps everything perfectly aligned at the back of your neck, stopping the dreaded twist-and-tangle cycle before it starts.
My Go-To Tip: The best defense is a good offense. Before you even put your necklaces on, make sure they are completely knot-free. Storing them properly by hanging them or using a jewelry box with separate compartments is a game-changer.
The "Overdoing It" Dilemma
It’s so easy to get carried away and pile on every piece you love. But when a stack gets too busy, the look can quickly go from chic to cluttered. Instead of a cohesive statement, you end up with a jumble where no single piece gets to shine.
If your stack just feels "off" or heavy, the fix is usually to remove one piece. It sounds counterintuitive, but editing is your best friend. Take a step back and ask yourself if every necklace is truly adding to the look. More often than not, taking away that one extra chain lets the other pieces breathe, resulting in a much more powerful and intentional style.
Improper Spacing and Bunching
This one is a bit more subtle, but it can throw off the whole vibe of your stack. It happens when your necklaces are either too close together (bunching up) or have awkward, large gaps between them. The goal is always that beautiful, cascading effect, and messy spacing just ruins the illusion.
You want to aim for a consistent gap of about one to two inches between each layer. This creates a really pleasing visual rhythm and gives each necklace its own moment.
What if two pieces you love are the exact same length? Don't give up on the pairing! Just grab a simple necklace extender and add it to one of the chains. This little accessory is a lifesaver for customizing lengths on the fly and ensuring your spacing is always spot-on.
Layering Problem Solver
Sometimes you just need a quick answer. I put together this little cheat sheet to help you diagnose and solve any layering issue in a pinch.
| Common Problem | Why It Happens | Quick Solution |
|---|---|---|
| Constant Tangling | Chains are too similar in length and weight, causing them to roll over each other. | Use a necklace spacer clasp or make sure your chains have different weights and textures. |
| Feeling Overwhelmed | Too many "statement" pieces are competing for attention at once. | Edit your stack. Just remove one piece and see how the look instantly feels more balanced. |
| Uneven Gaps | Spacing between necklaces is inconsistent, creating awkward gaps or bunching. | Aim for a consistent 1-2 inch gap between layers. A simple chain extender can fix this. |
| Looks Unintentional | The stack doesn't have a clear focal point or cohesive theme. | Pick a "hero" piece to be the star and build simpler, more delicate layers around it. |
Learning to spot these little issues and fix them quickly is what separates a good necklace stack from a great one. With these tricks up your sleeve, you'll be able to create a flawless, tangle-free look every single time.
Your Necklace Layering Questions, Answered
Alright, so we've covered the core principles, but you might still have a few nagging questions popping up as you're trying to put it all into practice. That’s perfectly normal. Getting the hang of layering is all about experimenting, and ironing out these specific details is what really builds your confidence.
Let's tackle some of the most common questions I hear. Think of this as the final check-in to make sure you feel totally ready to build and rock your necklace stacks.
How Many Necklaces Is Too Many?
This is the big one, isn't it? The honest answer is, it really depends. While there's no official rulebook, a stack of two to four necklaces is a fantastic starting point for most people and almost any occasion. The "Rule of Three" is popular for a reason—it just works, creating a look that feels balanced and intentional.
But here’s the real secret: it’s less about the number of necklaces and more about their visual weight. Five whisper-thin chains might actually look more understated than two really chunky ones.
The best way to know for sure? A quick mirror check. Does the stack feel distracting or physically heavy? Is it totally overpowering your outfit? If you get a "yes," trust your gut and take one piece off. More often than not, that small edit is all you need to nail the look.
- For everyday looks: Two or three necklaces is usually the sweet spot.
- For a statement vibe: Go ahead and play with four or more, but keep a close eye on that overall visual balance.
Can I Layer Necklaces of the Same Length?
Generally, you want to avoid this. When necklaces are the exact same length, they just pile on top of each other. Not only does this hide the unique design of each piece, but it's also a one-way ticket to Tangle City. The whole beauty of layering comes from that cascading effect, which absolutely requires some space between chains.
Try to have at least a one to two-inch difference between each necklace. This gives every piece its own moment to shine.
The Quick Fix: Have two necklaces you're dying to wear together but they're the same length? An inexpensive necklace extender will be your best friend. Just clip it onto one of the chains to instantly create that crucial bit of separation. It's a simple trick that makes a world of difference.
The only time I'd break this rule is if you're intentionally pairing two identical, very fine chains to create the illusion of a single, more substantial necklace.
What Is the Best Way to Stop Tangling?
Ah, the eternal struggle. Tangling is the number one frustration with layering, but I promise, it’s not something you just have to live with. A tangled mess is totally preventable.
The single most effective tool you can have in your arsenal is a necklace spacer (sometimes called a layering clasp). It’s a small bar with multiple clasps on it. You hook each necklace onto its own clasp, and the spacer holds them perfectly separated at the back of your neck. It’s an absolute game-changer.
Another great strategy is to mix up your chain textures and weights. Two thin, slinky chains are far more likely to get twisted than a delicate chain paired with a heavier snake or box chain. The difference in their weight and structure helps them naturally stay apart.
Should My Pendant Be the Longest or Shortest?
Great question! It really depends on the pendant itself and the story you want your stack to tell. There are two classic ways to style a pendant that both look fantastic.
- Use it as your anchor. This is the most common approach: make the pendant necklace the longest piece in your stack. It creates a natural focal point and a flattering V-shape that draws the eye downward. This works beautifully for larger, heavier, or more meaningful pendants.
- Make it a delicate detail. A tiny charm—like a little initial or a single birthstone—can look so lovely as the shortest layer, resting right at the collarbone. It adds a really personal touch without competing with your other necklaces.
As a general rule of thumb, bigger pendants work best as the anchor (longest layer), while smaller ones are more versatile and can be placed almost anywhere in the stack to add a pop of personality.
Feeling ready to build your own signature stack? The key is to start with high-quality, personal pieces that you'll love for years to come. At EFYTAL Jewelry, we specialize in handcrafted keepsake necklaces made from sterling silver and 14k gold-fill, perfect for creating layers that tell your unique story. Explore our collections and find your next hero piece.
Leave a comment
© 2025 EFYTAL Jewelry. Site By Shopify Expert


